
Guide to facebook and google + add comments without plugin
Hello everyone!
Probably the hottest events in the city last blog are the bad guys go on pretending Thach comment seriously misleading, it must move past that TP blog facebook comments system may be permanent but one of the things that have inadequacies.
So, in my first post, I will guide you add website, blog and Facebook comment system by adding one more big that comment by Google + without using plug-ins, quick, show beautiful.
Using the system and google + facebook comments are appropriate and beneficial for personal blogs, news sites or one of the other categories, but why, I did not mention here.
Step 1: Insert the js plugin Facebook and Google +
This step will insert one of your script before the </ body> in the theme.
Specifically inserted footer.php file
<Div id = "fb-root"> </ div><Script> (function (d, s, id) {var js, FJS = d.getElementsByTagName (s) [0];if (d.getElementById (id)) return;js = d.createElement (s); js.id = id;js.src = "//connect.facebook.net/vi_VN/all.js#xfbml=1";fjs.parentNode.insertBefore (js, FJS);} (Document, 'script', 'facebook-jssdk')); </ script><Script type = "text / javascript">gcfg = {lang window .___ 'vi'}; (Function () {var po = document.createElement ('script'); po.type = 'text / javascript'; po.async = true;po.src = 'https://apis.google.com/js/platform.js';var s = document.getElementsByTagName ('script') [0]; s.parentNode.insertBefore (po, s);}) ();</ Script>
Step 2: Declare comment on theme framework.
Once include js then, the next step is to declare the position displaying the comment. Most of us will insert it under the bottom of the post.
At this point there are two options:
Replace the WordPress comment system (recommended).
Add your comment below by WordPress.
To make us open single.php file and find sections
<? Php comments_template (); ?>
Replace if option 1 or inserted directly below if you choose option 2.
<Div class = "tabs comment"><Input id = "tab-1" type = "radio" name = "radio-set" class = "tab-selector-1" checked = "checked" /><Label for = "tab-1" class = "tab-label-1"> <i class = "fa-fa-square facebook"> </ i> Facebook </ label> <Input id = "tab-2" type = "radio" name = "radio-set" class = "tab-selector-2" /><Label for = "tab-2" class = "tab-label-2"> <i class = "fa fa-google-plus-square"> </ i> Google + </ label><Div class = "clear-shadow"> </ div> <Div class = "content-tab"><Div class = "tab-1"><Div class = "fb-comments" data-href = "<? Php the_permalink ();?>" Data-width = "650" data-numposts = "15" data-colorscheme = "light"> </ div></ Div><Div class = "tab-2"><Script src = "https://apis.google.com/js/plusone.js"> </ script><Div class = "g-comments" data-href = "<? Php the_permalink ();?>" Data-width = "650" data-first_party_property = "BLOGGER" data-view_type = "FILTERED_POSTMOD"> </ div></ Div></ Div></ Div>
P / S: the data-width values are customized according to your size yourselves styles.
Step 3: Makeup a bit with CSS3
Done step 2 above, you have to push Facebook and Google+ comment enough already, but if such default will be bad and cause long-equipped too, so we will leave it displayed as tabs offline.
Insert this into css section style.css file in the theme folder
/ * Tabs comment * /{.tabsmax-width: 650px;margin: 0 auto;position: relative;clear: both;padding-top: 20px;}.tabs h3 {font-size: 15px; background: # C0392B; color: #fff; padding: 0 20px; margin: 0 -24px;}.tabs input {position: absolute;top: 0;left: 0;display: none;}.tabs label {display: block;float: left;position: relative;padding: 10px 20px;line-height: 1.5em;min-width: 55px;text-align: center;color: # 222;font-size: 13px;font-weight: bold;letter-spacing: 1px;cursor: pointer; }.tabs label: after {content: "";display: block;position: absolute;width: 100%;height: 5px;background: #fff;left: 0;bottom: -5px;}.clear-shadow {clear: both;}.content-tab {position: relative;width: 100%;border-top: 1px solid #DDD;padding-top: 10px;margin-top: -1px;}.content-tab> div {overflow: hidden;top: 0;left: 0px;opacity: 0;display: none;transition: opacity .4s;-moz-transition: opacity .4s;-webkit-transition: opacity .4s;-ms-transition: opacity .4s;-o-transition: opacity .4s;}
.tabs input: checked + label {background: url (https://fbstatic-a.akamaihd.net/rsrc.php/v2/yf/r/PfBgtiydy5U.gif) no-repeat bottom center; z-index: 1}.tabs input.tab-selector-1: checked ~ .content-tab .tab-1,.tabs input.tab-selector-2: checked ~ .content-tab .tab-2 {opacity: 1; display: block;}
Now you into any one article and enjoy the fruits of his public.
Here is the demo on your site is using
Comment with facebook

MagXP - Ultimate Magazine WordPress Theme
MagXP is the ultimate Magazine WordPress Theme. With 4 homepage layouts, and an options panel that lets you control the design, you can change the design from bright and clean to dark and minimal quickly. MagXP combines flexibility, form and function perfectly.

Using the image on the right way and optimized website
The use of images on the website is inevitable because of the need to insert the image everyone, regardless of whether there is any event website. But there is a downside to upload the image to the host that will be quite expensive bandwidth capacity and if you have a massive image storage, no matter if you use WordPress, the mechanism automatically generated much different picture of it cost you extra storage. So if you are using a download photos directly to the host, please refer to the optimal experience your photos in this post.
Use any image format on the website?

To take the best picture and avoid using the wrong image format to heavy website, you should define each needs to use the most appropriate image format.
Select the type of image used appropriately.
Often the images we use most often on the website are GIF, PNG-8 or PNG-24 and JPEG. Each image formats are clearly different purposes which they summarize as follows:
GIF: Use for demand loading animation on the website.
PNG-8: Using the highly detailed images and sharper but only use colors in RGB color combinations. Supported image transparent (no background).
PNG-24: Used for highly detailed images and supports a variety of colors. Supported image transparent (no background).
JPEG / JPG: common image format, can reduce image quality, support multi-colored images. But not support animations and photos throughout.
So if under the demands on, if you do not wish to use the animation should take priority PNG and JPEG image formats. If the image is less cumbersome details, please use PNG-8 instead of JPEG quality for JPEG and PNG between the PNG will have better image quality.
When to use JPEG?
If you have photos with high color, use the color gradient (gradient), use JPEG for images with gradient, colors, use JPEG will help you achieve better image quality but the image size lower than PNG and GIF.
When to use PNG images?
PNG PNG-8 and then PNG-24, in which the PNG-8 is a new image format with features such as PNG-24 but can be used in some cases to replace JPEG images such as transparent or for the few color photographs.
If you want to post high-quality photos, keep up the quality, use PNG-24 because it is a lossless compression image format is JPEG lossy compression should also be much less quality loss. However, I found, you should completely switch to using PNG-24 is not required if the animation, then use the tool to reduce the size of images lightest but better quality JPEG lot. That is why the current Thachpham.com full use PNG image if the image made by them as a screenshot for example.
Comparison between PNG and JPEG
Here are two photos of her taken by software Snagit 12 and save it as a JPEG (quality 75%) and PNG-24, you see the difference to it.
JPEG - 45KB
JPEG - 45KB
PNG - 13KB
PNG - 13KB
Please compress images before uploading website

You should compress image (reduced image size, not the size reduction) before uploading website if you do not wish to retain maximum quality. An original image compression if you can save up to 70-80% of a quality that is almost unchanged if using the naked eye, note that the PNG format you can compress better, but JPEG is compression will be less than for which it has already been compressed.
Up to 50% capacity when compressed, why not?
Up to 50% of the amount of compression, why not?
The best image compression applications
Cesium (Windows)
This software supports you compress the picture formats such as PNG, JPEG and BMP, can compress multiple photos at once in the directory, and completely free.
ImageOptim (Mac)
This is rather like an application on your Mac and use frequently in my time Mac user since it was just slightly dangerous and free. It supports you to extract some common image formats such as JPEG, PNG and GIF.
PngOptimizer (Windows)
This is a small application and now I'm used to compress PNG images.
Kraken (Web)
If you need fast image compression, compression and support features reduce the image size, the Kraken would quite suit you. You can also direct compression available from a link or compress all images in a website with Page Cruncher.
Image Compression on WordPress
If you are using WordPress and should compress the images you've uploaded to the library, you can use one of the following three great plugin.
Ewww Image Optimizer
This free plugin support is quite good compression and supports most image formats. It supports you automatically compressed when uploading photos or direct compression library.
Another reason you should use this plugin is that it supports your entire image compression on the host via WP-CLI command, so if you are using a server that is using WP-CLI to install this plugin and then tap the folder WordPress wp ewwwio help optimize for instructions.
WP Smush
The function of WP Smush similar ewww Image Optimizer, allowing self-compression and compression when uploading photos directly in the library, but it is somewhat compact and easier to use.
Kraken

If you prefer to spend their money better compression, do not spend a lot of server resources (by using external service), you can use the services of the Kraken, supports lossless image compression options or Lossy but you have to pay at least $ 5 / month.
Reduce size photos
There is one thing you should know that a picture is too big or too heavy when uploaded to the website will be quite wasteful of bandwidth and hard drive capacity of the server. For example, if you are not a photographer, or log Wallpaper is a photo posted on the website so you should only have a maximum width 1024px because if so, the user has to make something better that saw they must click on the image and then zoom out to get a new look.
Epilogue
So why the pictures on website optimization is so important and so interesting? Simply put, if not optimal, it will cost you more space to store, consuming more bandwidth so you will costs more to hire host / server. In addition, high-volume image will make the page loading speed should be affected a little picture on the website using the correct way is a better website speed.
Use any image format on the website?
To take the best picture and avoid using the wrong image format to heavy website, you should define each needs to use the most appropriate image format.
Select the type of image used appropriately.
Often the images we use most often on the website are GIF, PNG-8 or PNG-24 and JPEG. Each image formats are clearly different purposes which they summarize as follows:
GIF: Use for demand loading animation on the website.
PNG-8: Using the highly detailed images and sharper but only use colors in RGB color combinations. Supported image transparent (no background).
PNG-24: Used for highly detailed images and supports a variety of colors. Supported image transparent (no background).
JPEG / JPG: common image format, can reduce image quality, support multi-colored images. But not support animations and photos throughout.
So if under the demands on, if you do not wish to use the animation should take priority PNG and JPEG image formats. If the image is less cumbersome details, please use PNG-8 instead of JPEG quality for JPEG and PNG between the PNG will have better image quality.
When to use JPEG?
If you have photos with high color, use the color gradient (gradient), use JPEG for images with gradient, colors, use JPEG will help you achieve better image quality but the image size lower than PNG and GIF.
When to use PNG images?
PNG PNG-8 and then PNG-24, in which the PNG-8 is a new image format with features such as PNG-24 but can be used in some cases to replace JPEG images such as transparent or for the few color photographs.
If you want to post high-quality photos, keep up the quality, use PNG-24 because it is a lossless compression image format is JPEG lossy compression should also be much less quality loss. However, I found, you should completely switch to using PNG-24 is not required if the animation, then use the tool to reduce the size of images lightest but better quality JPEG lot. That is why the current Thachpham.com full use PNG image if the image made by them as a screenshot for example.
Comparison between PNG and JPEG
Here are two photos of her taken by software Snagit 12 and save it as a JPEG (quality 75%) and PNG-24, you see the difference to it.
JPEG - 45KB
JPEG - 45KB
PNG - 13KB
PNG - 13KB
Please compress images before uploading website
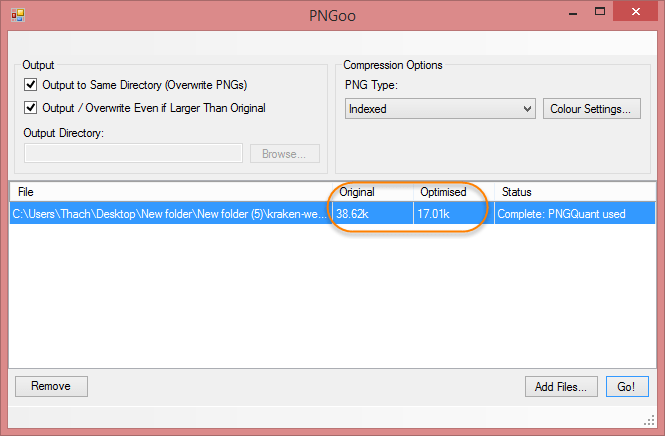
You should compress image (reduced image size, not the size reduction) before uploading website if you do not wish to retain maximum quality. An original image compression if you can save up to 70-80% of a quality that is almost unchanged if using the naked eye, note that the PNG format you can compress better, but JPEG is compression will be less than for which it has already been compressed.
Up to 50% capacity when compressed, why not?
Up to 50% of the amount of compression, why not?
The best image compression applications
Cesium (Windows)
This software supports you compress the picture formats such as PNG, JPEG and BMP, can compress multiple photos at once in the directory, and completely free.
ImageOptim (Mac)
This is rather like an application on your Mac and use frequently in my time Mac user since it was just slightly dangerous and free. It supports you to extract some common image formats such as JPEG, PNG and GIF.
PngOptimizer (Windows)
This is a small application and now I'm used to compress PNG images.
Kraken (Web)
If you need fast image compression, compression and support features reduce the image size, the Kraken would quite suit you. You can also direct compression available from a link or compress all images in a website with Page Cruncher.
Image Compression on WordPress
If you are using WordPress and should compress the images you've uploaded to the library, you can use one of the following three great plugin.
Ewww Image Optimizer
This free plugin support is quite good compression and supports most image formats. It supports you automatically compressed when uploading photos or direct compression library.
Another reason you should use this plugin is that it supports your entire image compression on the host via WP-CLI command, so if you are using a server that is using WP-CLI to install this plugin and then tap the folder WordPress wp ewwwio help optimize for instructions.
WP Smush
The function of WP Smush similar ewww Image Optimizer, allowing self-compression and compression when uploading photos directly in the library, but it is somewhat compact and easier to use.
Kraken
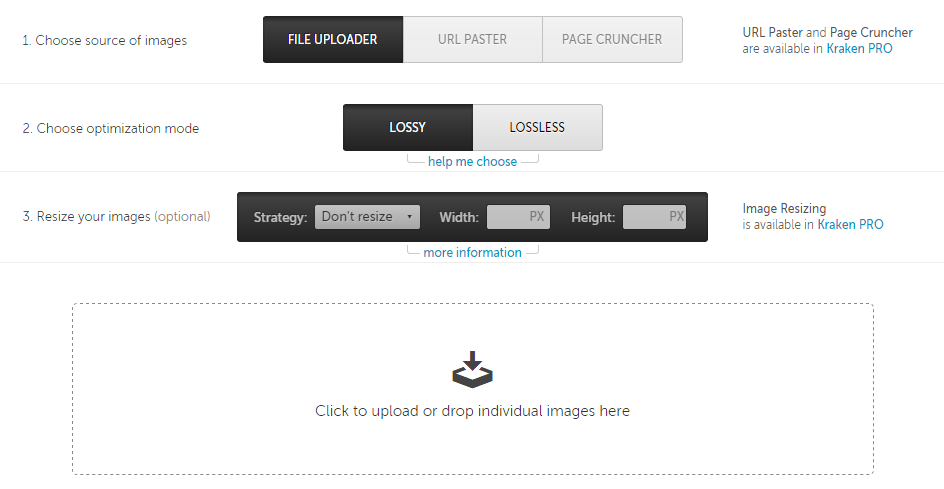
If you prefer to spend their money better compression, do not spend a lot of server resources (by using external service), you can use the services of the Kraken, supports lossless image compression options or Lossy but you have to pay at least $ 5 / month.
Reduce size photos
There is one thing you should know that a picture is too big or too heavy when uploaded to the website will be quite wasteful of bandwidth and hard drive capacity of the server. For example, if you are not a photographer, or log Wallpaper is a photo posted on the website so you should only have a maximum width 1024px because if so, the user has to make something better that saw they must click on the image and then zoom out to get a new look.
Epilogue
So why the pictures on website optimization is so important and so interesting? Simply put, if not optimal, it will cost you more space to store, consuming more bandwidth so you will costs more to hire host / server. In addition, high-volume image will make the page loading speed should be affected a little picture on the website using the correct way is a better website speed.
Optimize the Meta Description tag each post Blogspot
Optimize the Meta Description tag every article Blogger is essential!
In the new interface, the search description are added to help users optimize search engine friendly with google.

Meta Description tag is what?
This is an HTML element, an XML description of the site to the search engines collect and display information on ranking positions under the title includes 150 characters.
Add Meta Description tags common to Blogger.
On Blogger> Settings> Search Options
Find the Meta tags, check the "Yes" to Active.
A dialog box will appear, you write meta tags for your homepage here. Make sure that no more than 150 characters.
Click SAVE to see change.

Now move on to the next step is to meta decription for each article
Add Meta Tags tab for each article
When you write a new post, you see "Description Search" in the sidebar, simply write a summary description of the search for that article.
If you forget to write, google will automatically get 1 random sections relevant to your article displayed on the search results.

In the new interface, the search description are added to help users optimize search engine friendly with google.
Meta Description tag is what?
This is an HTML element, an XML description of the site to the search engines collect and display information on ranking positions under the title includes 150 characters.
Add Meta Description tags common to Blogger.
On Blogger> Settings> Search Options
Find the Meta tags, check the "Yes" to Active.
A dialog box will appear, you write meta tags for your homepage here. Make sure that no more than 150 characters.
Click SAVE to see change.
Now move on to the next step is to meta decription for each article
Add Meta Tags tab for each article
When you write a new post, you see "Description Search" in the sidebar, simply write a summary description of the search for that article.
If you forget to write, google will automatically get 1 random sections relevant to your article displayed on the search results.

SteadyIncome
SteadyIncome is the ultimate WordPress theme for online marketers, bloggers, and entrepreneurs. It's packed with features such as a powerful subscription tool, ad optimization, featured products section, and a beautiful responsive design that will all boost your online earnings.


[ WordPress ] WooCart
WooCart is the ultimate WordPress eCommerce theme for selling products online. With all the features you've come to expect from MyThemeShop, and some special features just for sellers, you will sell more, earn more, and have the perfect eCommerce website with WooCart.


